> ## Documentation Index
> Fetch the complete documentation index at: https://docs.elemente.ai/llms.txt
> Use this file to discover all available pages before exploring further.
# Calendar Booking
> Connect and configure your calendar to manage appointments and events effectively with the AI Receptionist agent.
## Overview
Calendar integration enables system users to connect their preferred calendar services, such as Google Calendar or Outlook Calendar, to automate appointment management. By integrating a calendar, the AI Receptionist agent can handle bookings, manage availability, and schedule events based on user-defined preferences.
## Benefits of Calendar Integration
1. **Streamlined Scheduling:** Automatically manage appointments based on your calendar's availability.
2. **Multi-Calendar Support:** Integrate with various services like Google Calendar, Outlook Calendar, cal.com, or Calendly.
3. **Real-Time Synchronization:** Ensure seamless updates across platforms to avoid conflicts.
4. **Enhanced Productivity:** Let the AI Receptionist agent handle scheduling tasks while you focus on other priorities.
## Steps to Set Up Calendar Integration
### **1. Access the Integration Tab**
1. From the main dashboard, navigate to **Agent Manager**.
2. On the left sidebar, click on the **Action** tab.
3. Locate the **Calendar Integration** section.
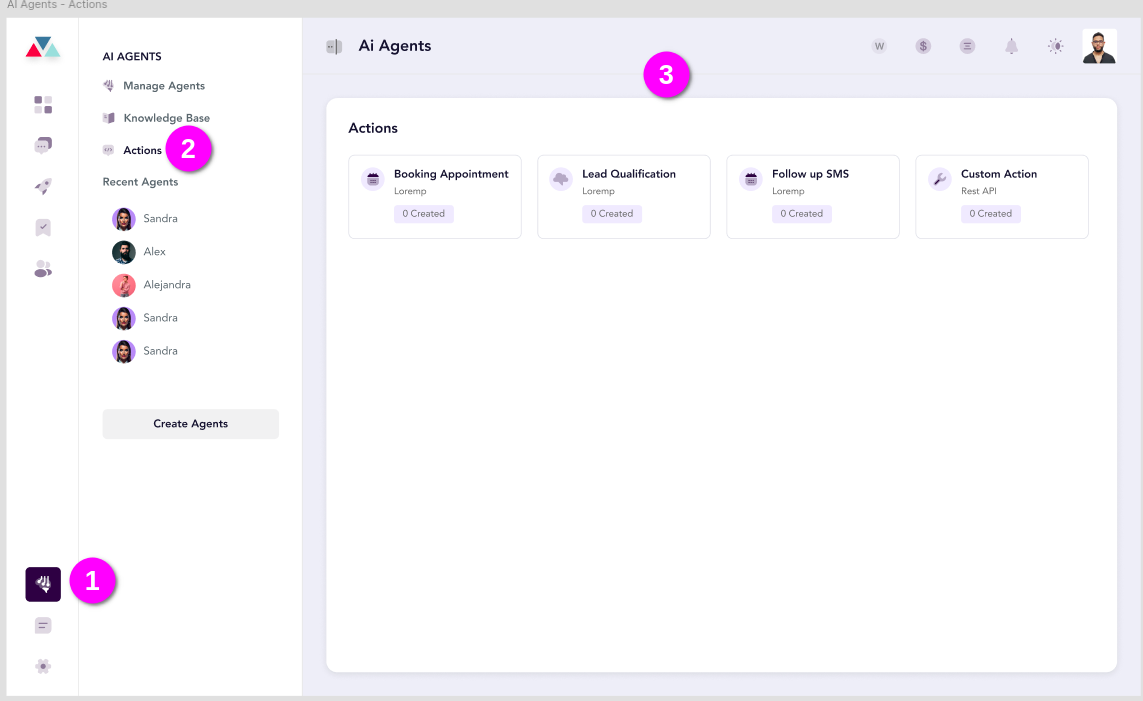 **Note:** If no calendar is connected, the user cannot create events, integrate, or view the calendar. A prompt will display, guiding the user to connect a calendar.
### **2. Connect a Calendar**
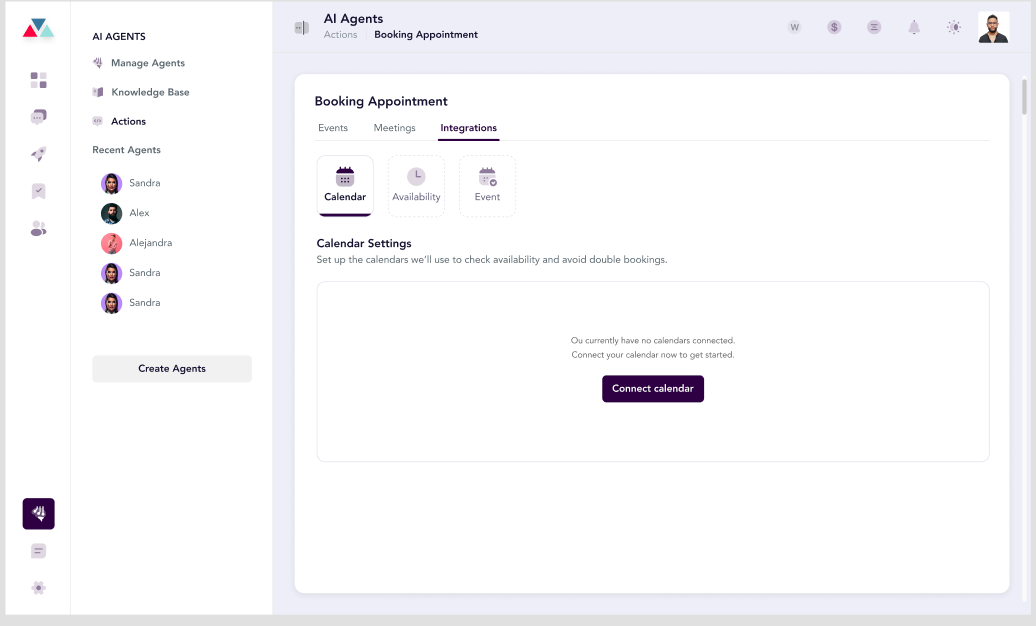
1. Click on the **Connect Calendar** button in the **Integration** tab.
**Note:** If no calendar is connected, the user cannot create events, integrate, or view the calendar. A prompt will display, guiding the user to connect a calendar.
### **2. Connect a Calendar**
1. Click on the **Connect Calendar** button in the **Integration** tab.
 2. A modal will appear, listing supported calendar services:
* **Google Calendar**
* **Outlook Calendar**
* **cal.com**
* **Calendly**
2. A modal will appear, listing supported calendar services:
* **Google Calendar**
* **Outlook Calendar**
* **cal.com**
* **Calendly**
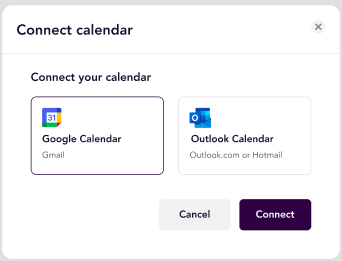 3. Select your preferred calendar service.
4. Authenticate your account by following the on-screen instructions for the selected service.
5. Once authentication is successful, the system will confirm the connection.
### **3. Configure Calendar Availability**
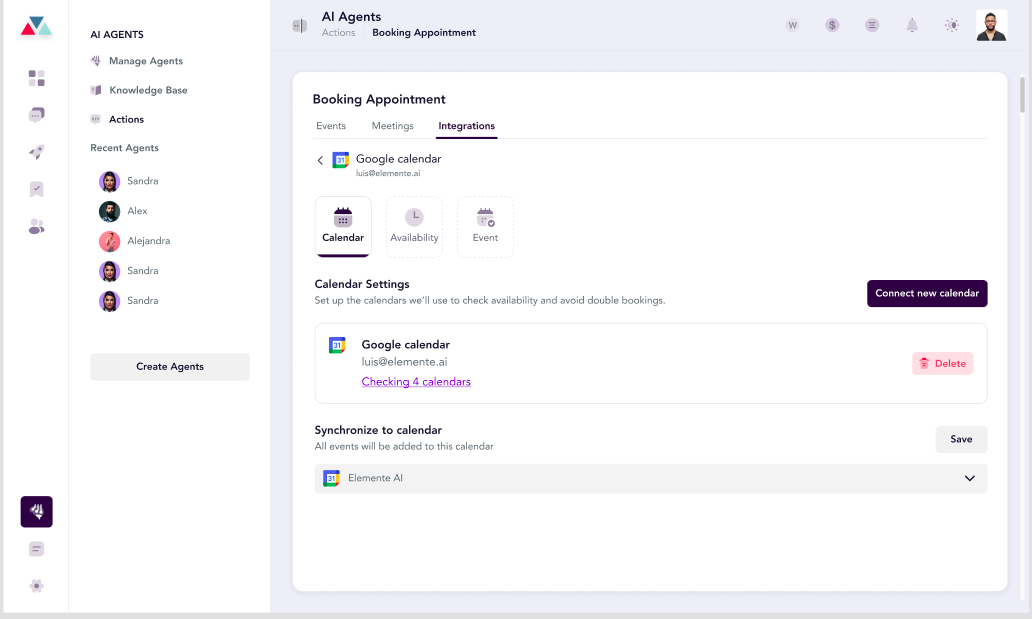
1. After connecting a calendar, you will see the **Calendar Availability** options.
2. Configure the following settings:
* **Meeting Hours:** Define your available time slots for meetings:
* Select the days of the week you are available.
* Add specific time slots for each day.
* Use the **Copy Time Slots** button to replicate availability across multiple days.
* Change the time zone as needed.
* **Conflict Avoidance:** Select calendars to avoid scheduling conflicts.
* **Default Calendar:** Choose one calendar to sync all events.
3. Select your preferred calendar service.
4. Authenticate your account by following the on-screen instructions for the selected service.
5. Once authentication is successful, the system will confirm the connection.
### **3. Configure Calendar Availability**
1. After connecting a calendar, you will see the **Calendar Availability** options.
2. Configure the following settings:
* **Meeting Hours:** Define your available time slots for meetings:
* Select the days of the week you are available.
* Add specific time slots for each day.
* Use the **Copy Time Slots** button to replicate availability across multiple days.
* Change the time zone as needed.
* **Conflict Avoidance:** Select calendars to avoid scheduling conflicts.
* **Default Calendar:** Choose one calendar to sync all events.
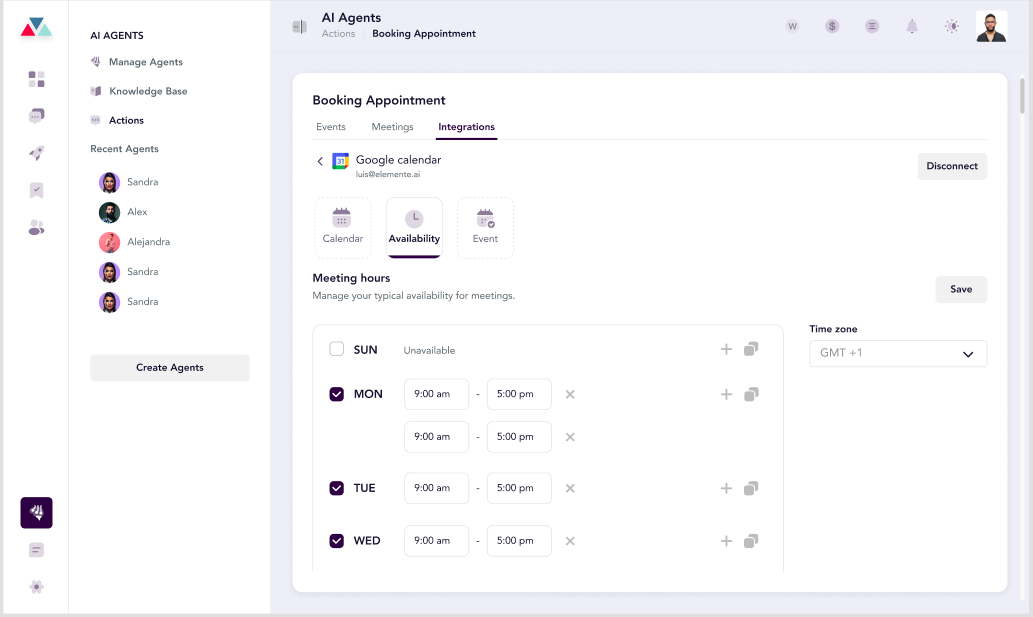 3. Click **Save Changes** to apply your configurations.
### **4. Create and Manage Events**
1. Navigate to the **Events** section within the **Calendar Integration** tab.
2. To create a new event:
* Click **Create Event**.
* Fill in the event details:
* **Event Name (mandatory):** Enter the name of the event.
* **Description (optional):** Provide additional details about the event.
* **Participants:** Add participants to the event.
* **Duration:** Specify the duration of the event.
* **Notification Channels:** Choose how participants will be notified (e.g., email, SMS).
3. Click **Save Changes** to apply your configurations.
### **4. Create and Manage Events**
1. Navigate to the **Events** section within the **Calendar Integration** tab.
2. To create a new event:
* Click **Create Event**.
* Fill in the event details:
* **Event Name (mandatory):** Enter the name of the event.
* **Description (optional):** Provide additional details about the event.
* **Participants:** Add participants to the event.
* **Duration:** Specify the duration of the event.
* **Notification Channels:** Choose how participants will be notified (e.g., email, SMS).
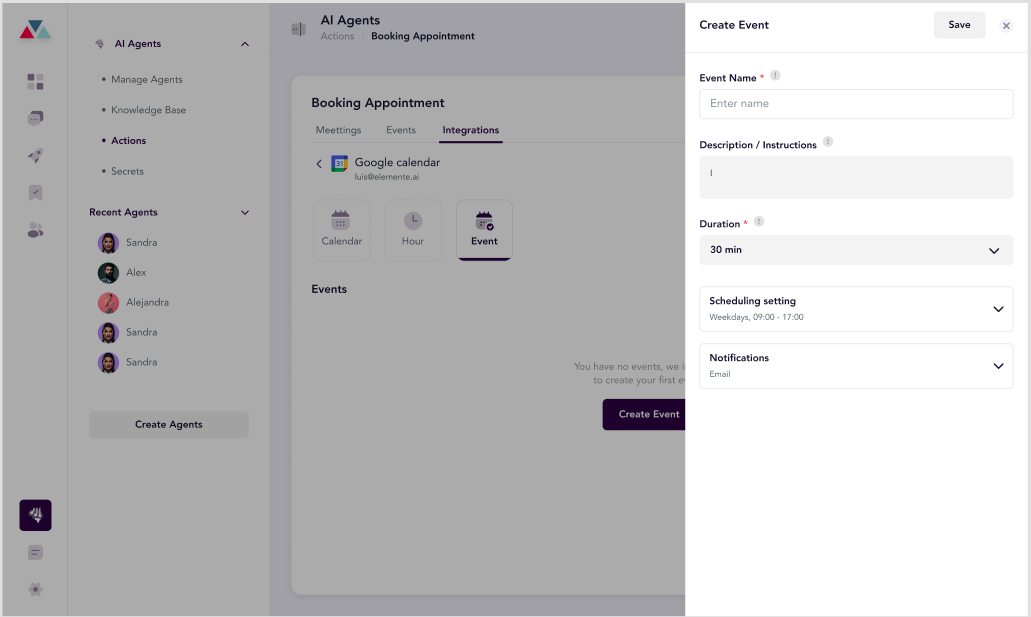 * Click **Save** to finalize the event.
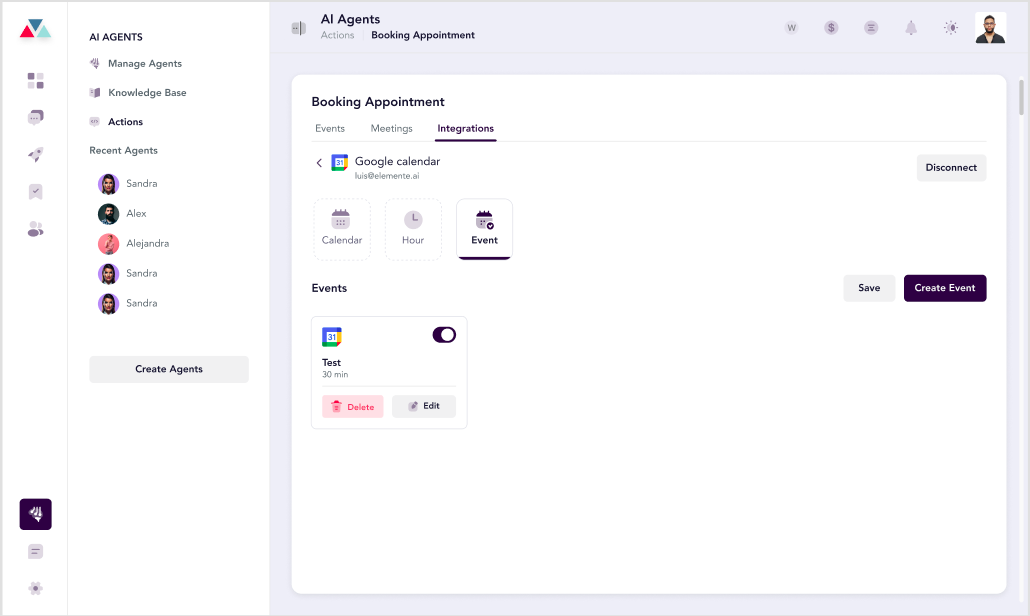
3. Manage existing events using the event table, which displays:
* **Event Name**
* **Description**
* **Booking Date**
* **Action Buttons** for editing or deleting events.
* Click **Save** to finalize the event.
3. Manage existing events using the event table, which displays:
* **Event Name**
* **Description**
* **Booking Date**
* **Action Buttons** for editing or deleting events.
 ### **5. Synchronize Calendars**
1. Return to the **Calendar Settings** tab.
2. Use the **Sync Now** button to synchronize events across all connected calendars.
3. Review and adjust any conflicting events as needed.
### **5. Synchronize Calendars**
1. Return to the **Calendar Settings** tab.
2. Use the **Sync Now** button to synchronize events across all connected calendars.
3. Review and adjust any conflicting events as needed.
 ### **6. Adding Calendar Bookings on Agent Settings**
The **Calendar Booking** feature allows your AI agent to manage appointments efficiently by leveraging pre-configured calendar events.
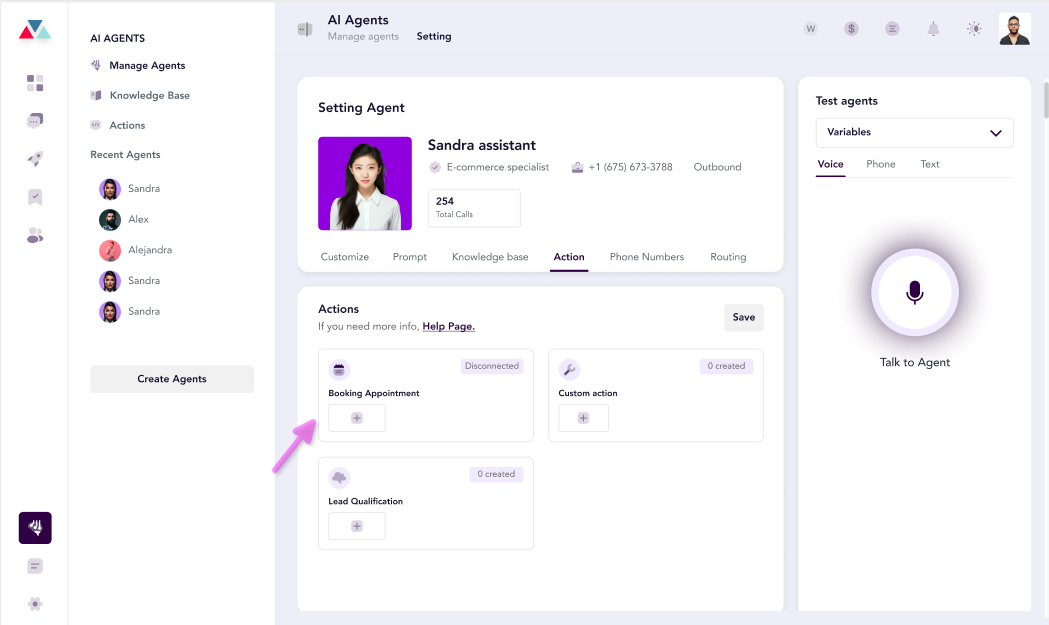
1. Navigate to the **Actions** tab under **Agent Settings**.
2. Locate the **Booking Appointment** card and click the **+** icon to begin.
### **6. Adding Calendar Bookings on Agent Settings**
The **Calendar Booking** feature allows your AI agent to manage appointments efficiently by leveraging pre-configured calendar events.
1. Navigate to the **Actions** tab under **Agent Settings**.
2. Locate the **Booking Appointment** card and click the **+** icon to begin.
 3. Select from the list of pre-defined events created on the **Calendar Action** page.
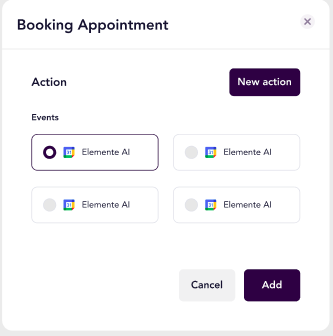 4. Save the configuration to enable the **Booking Appointment** functionality for the selected agent.
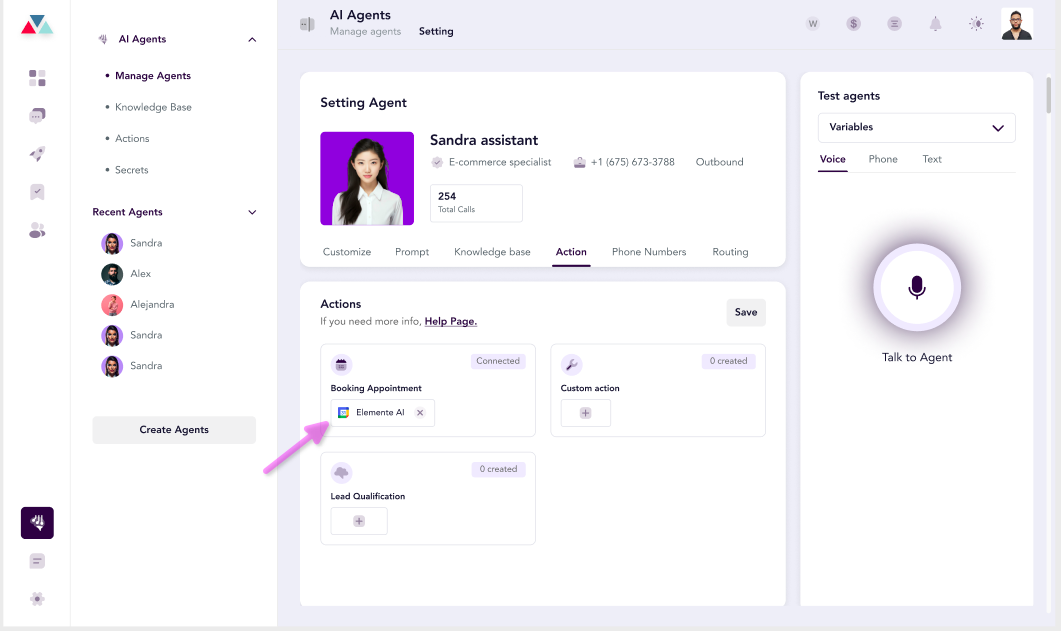 5. Once configured, the agent will automatically:
* **Book Appointments:** Schedule new appointments based on the user's availability.
* **Cancel Appointments:** Manage cancellations for previously scheduled events.
* **Reschedule Appointments:** Adjust existing appointments to new time slots.
For a detailed guide on how to book, cancel, and reschedule appointments,visit the [Booking appointment Guide prompt](/guide/booking_sample).
5. Once configured, the agent will automatically:
* **Book Appointments:** Schedule new appointments based on the user's availability.
* **Cancel Appointments:** Manage cancellations for previously scheduled events.
* **Reschedule Appointments:** Adjust existing appointments to new time slots.
For a detailed guide on how to book, cancel, and reschedule appointments,visit the [Booking appointment Guide prompt](/guide/booking_sample).