> ## Documentation Index
> Fetch the complete documentation index at: https://docs.elemente.ai/llms.txt
> Use this file to discover all available pages before exploring further.
# Starter guide
> Learn how to use Elemente Agent in under five minutes
# Onboarding Process Guide for New Users
Welcome to our platform! Follow this step-by-step guide to complete your onboarding process and start leveraging the power of your AI agents.
## Step 1: Authentication
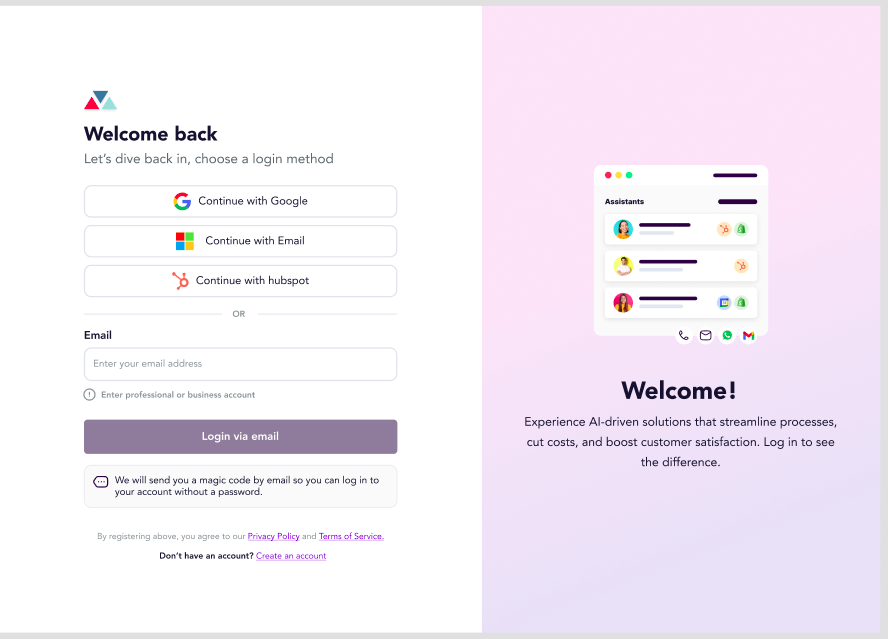
The first step in the onboarding process is authentication. You can authenticate using one of the following methods:
* **Google Sign-In**: Use your Google account for quick and secure authentication.
* **Email Sign-In**: Enter your email address and password to create or log into your account.
Once authenticated, you’ll be guided to set up your workspace.
 ## Step 2: Setting Up Your Workspace
After successful authentication, you’ll configure your workspace. This process involves three steps: **Workspace**, **Team**, and **Agent**.
### Step 2.1: Workspace
1. Fill out the **Workspace Form**:
* **Name of Workspace**: Enter a unique name for your workspace.
* **Company Logo (Optional)**: Upload a company logo to personalize your workspace.
## Step 2: Setting Up Your Workspace
After successful authentication, you’ll configure your workspace. This process involves three steps: **Workspace**, **Team**, and **Agent**.
### Step 2.1: Workspace
1. Fill out the **Workspace Form**:
* **Name of Workspace**: Enter a unique name for your workspace.
* **Company Logo (Optional)**: Upload a company logo to personalize your workspace.
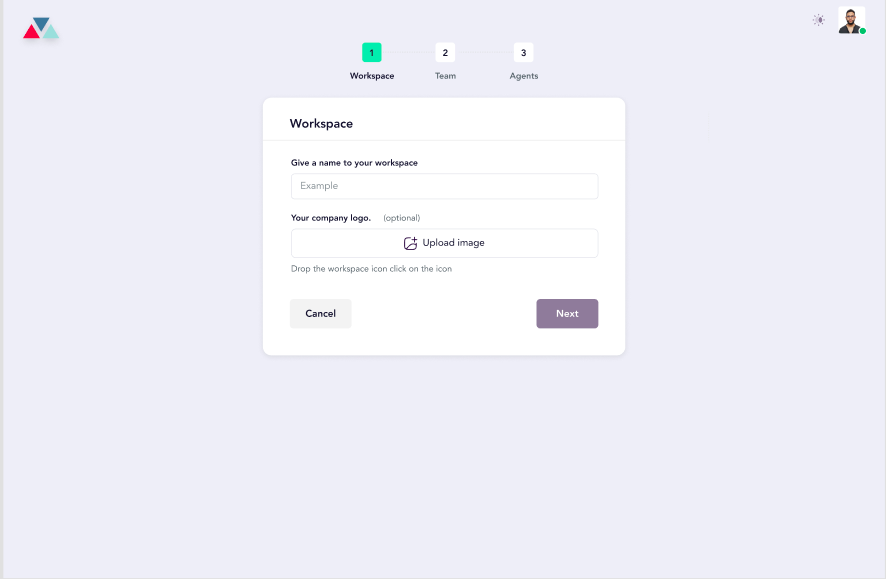 2. Click **Next** to proceed.
### Step 2.2: Team
In this step, you can invite team members to your workspace. This step is optional, and you can skip it if you wish.
* **Add Team Members**:
* Enter the **email address** of the member you want to invite.
* Use the **Role Dropdown** to assign a role (e.g., Admin, Editor, Viewer).
* Click the **Add More Members** button to invite additional team members.
* **Invite via Link**:
* Select a role from the dropdown menu.
* Click **Generate Invite Link** to create a unique invitation link.
* Share this link with the intended team member.
2. Click **Next** to proceed.
### Step 2.2: Team
In this step, you can invite team members to your workspace. This step is optional, and you can skip it if you wish.
* **Add Team Members**:
* Enter the **email address** of the member you want to invite.
* Use the **Role Dropdown** to assign a role (e.g., Admin, Editor, Viewer).
* Click the **Add More Members** button to invite additional team members.
* **Invite via Link**:
* Select a role from the dropdown menu.
* Click **Generate Invite Link** to create a unique invitation link.
* Share this link with the intended team member.
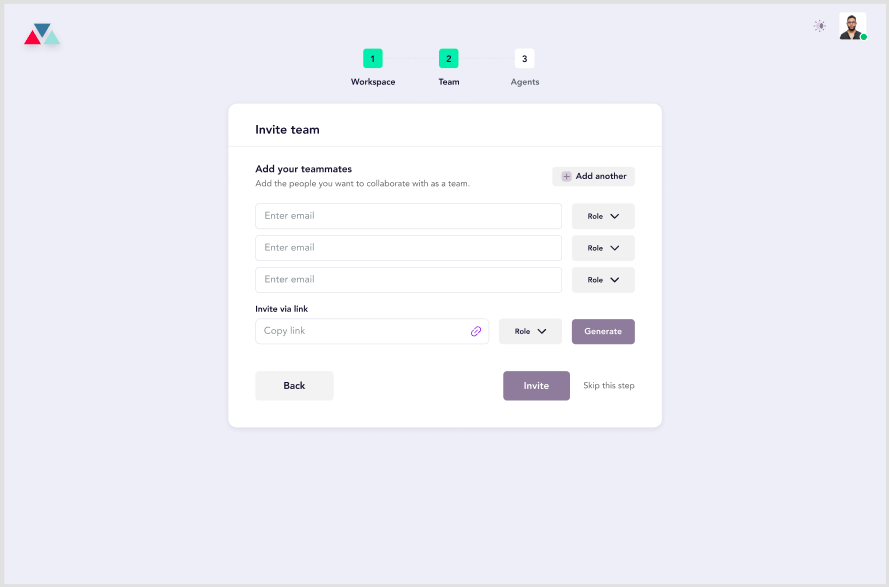 After completing this step, click **Next** to proceed.
### Step 2.3: Agent
Set up your AI agent by selecting from two pre-configured agents:
* **Sandra**
* **Title**: AI Receptionist
* **Description**: "Hi! I'm Sandra, your AI receptionist, here to take the burden of administrative tasks off your shoulders."
* **Alex**
* **Title**: E-Commerce Specialist
* **Description**: "Hi! I'm Alex, your new e-commerce specialist! I'm here to take care of everything from personalized marketing campaigns."
1. Choose either **Sandra** or **Alex** as your agent.
2. Click **Get Started** to finalize your selection.
After completing this step, click **Next** to proceed.
### Step 2.3: Agent
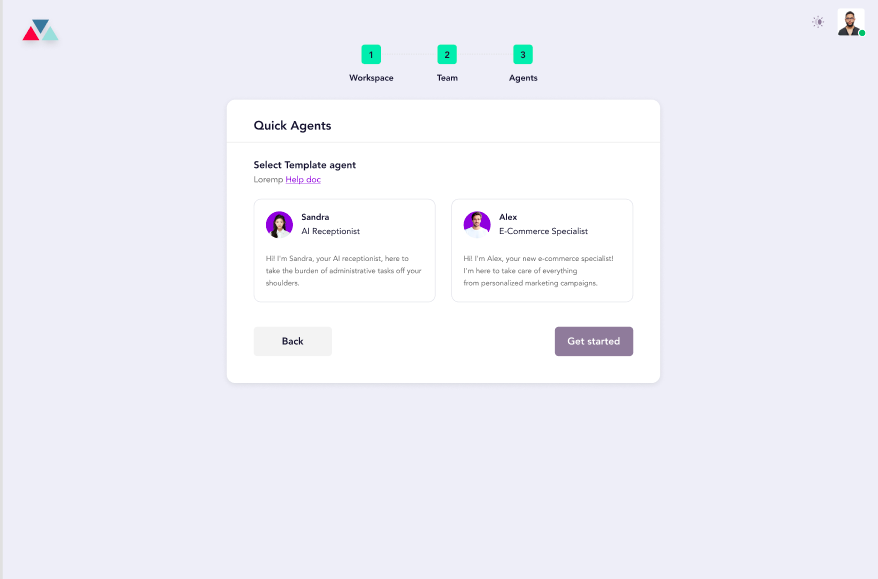
Set up your AI agent by selecting from two pre-configured agents:
* **Sandra**
* **Title**: AI Receptionist
* **Description**: "Hi! I'm Sandra, your AI receptionist, here to take the burden of administrative tasks off your shoulders."
* **Alex**
* **Title**: E-Commerce Specialist
* **Description**: "Hi! I'm Alex, your new e-commerce specialist! I'm here to take care of everything from personalized marketing campaigns."
1. Choose either **Sandra** or **Alex** as your agent.
2. Click **Get Started** to finalize your selection.
 ## Step 3: Dashboard Overview
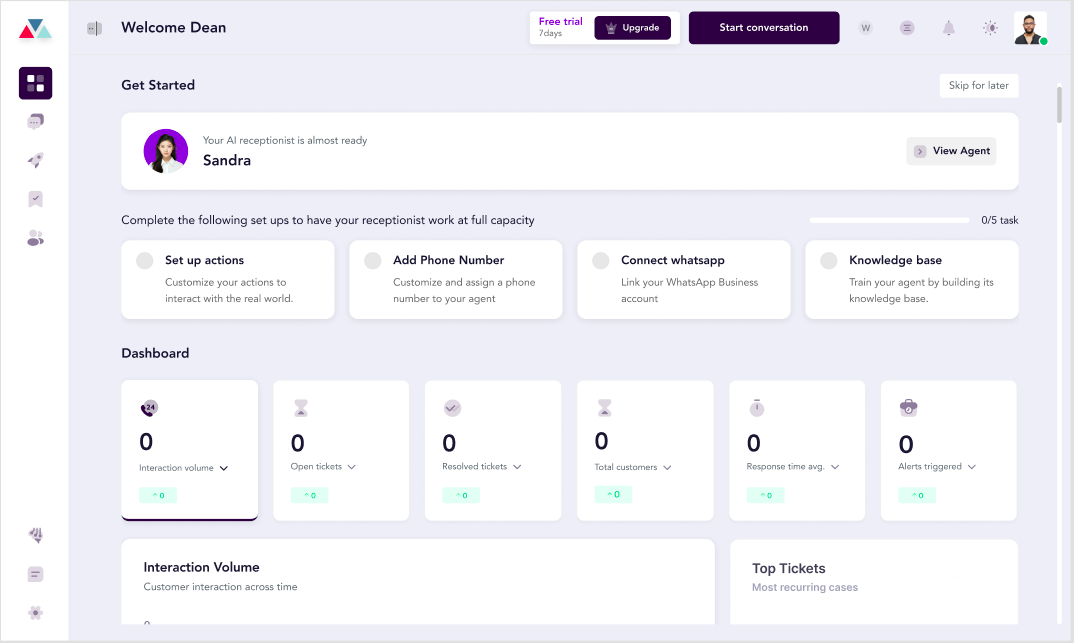
Once onboarding is complete, you’ll be redirected to the dashboard. Here’s what you’ll find:
### **AI Agent Testing**
* Click the **Test Agent** button to access the AI Agent Settings page and evaluate your agent’s capabilities.
### **Dashboard Widgets**
1. **Set Up Actions**:
* Configure actions such as calendar connections, lead qualification, and custom actions like CRM integration (HubSpot, Salesforce, or Shopify).
2. **Add Phone Number**:
* Assign a phone number to your agent to enable call-based interactions.
3. **Connect to WhatsApp**:
* Link your agent’s phone number to WhatsApp for seamless communication.
4. **Knowledge Base**:
* Assign a knowledge base to your agent to enable intelligent responses.
### **Analytics Cards**
Stay informed with key metrics:
* **Interaction Volume**
* **Open Tickets**
* **Resolved Tickets**
* **Total Customers**
* **Response Time (Avg.)**
* **Alerts Triggered**
## Step 3: Dashboard Overview
Once onboarding is complete, you’ll be redirected to the dashboard. Here’s what you’ll find:
### **AI Agent Testing**
* Click the **Test Agent** button to access the AI Agent Settings page and evaluate your agent’s capabilities.
### **Dashboard Widgets**
1. **Set Up Actions**:
* Configure actions such as calendar connections, lead qualification, and custom actions like CRM integration (HubSpot, Salesforce, or Shopify).
2. **Add Phone Number**:
* Assign a phone number to your agent to enable call-based interactions.
3. **Connect to WhatsApp**:
* Link your agent’s phone number to WhatsApp for seamless communication.
4. **Knowledge Base**:
* Assign a knowledge base to your agent to enable intelligent responses.
### **Analytics Cards**
Stay informed with key metrics:
* **Interaction Volume**
* **Open Tickets**
* **Resolved Tickets**
* **Total Customers**
* **Response Time (Avg.)**
* **Alerts Triggered**
 By completing the onboarding process, you’ll have a fully configured workspace and AI agent ready to assist you. Explore the dashboard to customize your experience and start achieving your goals efficiently!